
AS FEATURED IN

Answers to your Bagpipe Questions
by Jori Chisholm, Founder of BagpipeLessons.com
Last Updated: April 11, 2025
In today’s live video, I’ll answer your more of your emailed questions about many important bagpipe topics.
I started BagpipeLessons.com 25 years ago with the simple goal to provide high-quality information and inspiration for anyone, anywhere in the world who has a dream to learn to play the bagpipes. Thanks to you support, my business has been able to grow and help thousands of pipers of all levels. Join me and help me determine the future direction for BagpipeLessons.com. Thank you!
Watch the video and scroll down to read the full video script.
Video Transcript: Hey everybody, Jori Chisholm. I’m going live again. I did a live sort of “Ask me anything” answer to your questions last week and it was really fun. I got some great feedback so I thought I’d do it again.
It’s Friday afternoon here in Seattle and I’ve got some more answers to some of your bagpipe questions. So people email me through my website BagpipeLessons.com. People reach out to me on social media and also I’ve got some free guides that you can download if you go to BagpipeLessons.com/learn.
That’s my Learn page. It’s got links to videos and online courses and lots of free stuff including these free guides. When I send out these free guides like, “How to Get the Most out of your Practice,” “How to Get a World-Class Bagpipe Sound,” “How to Get the Best Out of your Online Lessons,” all kinds of cool topics, when I email people the PDFs, I’ll ask them, “What are some of your greatest challenges that you’re dealing with in your piping?” I get some great responses back. So I’m going to go through some of those questions that I’ve got recently and maybe some of these things will be interesting to you.
Okay, question number one. I’d like to see bagpipe bag ergonomics addressed. There doesn’t seem to be much info on bag dimensions except the flat depth of bag. The distance from drone placement to the chanter I think is crucial to allow an efficient playing position depending on the player’s reach. It’s expensive to trial and error several bag sizes and manufacturers to find the best fit. Thanks. Wow, big topic. So just to step back for a second, this is a really important topic because there are two parts of your bagpipe that can be sized for you and that is the pipe bag itself, and the blowpipe. It’s really important to get those the right length and the right size so that you can be comfortable.
The idea of ergonomics is to find a way that you can work with your equipment and your body in the most biomechanically friendly way. So what that means is that basically: that things fit. I would say a lot of people struggle with blowpipes that are too long and bags that are too large generally.
So I sell the Bannatyne Hybrid bags on my BagpipeLessons.com shop, and there are other bags out there. These are my favorite: high quality, last a long time, great value, just a really great bag and I credit Willie McCallum who almost 20 years ago suggested that I try the Bannatyne bag.
I’m really glad that I did. His suggestion at the time was that it’s just really hard and airtight. You know when you get it full, and it’s really a great bag in terms of efficiency and allowing you to keep a really steady pressure because the bag doesn’t have any sort of give or stretchiness or sponginess to it which I love.
Most of the bags that I sell are small or extended small or the Willie McCallum size. So Willie actually worked with Bannatyne to design a custom bag for him which is available to everybody now and those are the three most popular sizes.
I’ve never even stocked a medium or a large. I can’t think of anybody who would need a medium or large. They’re really really quite big and the sizing is kind of a little bit misleading. When you look at the tag on your shirt and you think, “Oh I’m a medium, I’m a large, I’m a small, I’m an XL,” whatever and you think that there’s going to be some connection to pipe sizing.
It’s not like that at all. I would say if you are 5’7” or shorter, you want to go with a small. If you’re 5’7” taller, you can still go with a small. I know people well over six feet tall who have a small bag and who love it. The size of the bag generally reflects how big it is around, and there’s no advantage to having a bag that’s bigger around. A smaller bag has lots of advantages. It’s quicker to fill up so it’s easier on attacks. It’s easier to deflate so it’s better on cutoffs, and you can shove it up higher into your arm. So imagine taking an American football and shoving it up in your armpit, or imagine taking a soccer ball. You can’t get it up quite as high, or a beach ball is even harder.
So a larger bag just means it’s harder to get up under your arm and the more leverage you get, and the more secure fit that you get under there, taller than 5’7”, you can think about it a little bit.
If you’re 5’7” or shorter, just go with a small. I think you will be really happy. I play a small bag. And that’s sort of my default recommendation: Bannatyne’s size, what they call extended small. Again, the naming is a little bit confusing here, because you would think, oh, well, that’s a small. But it’s extended in some way. Well, how is it extended? Well, it’s a little bit longer in the back. So it is extended, but it’s out the back. So it doesn’t really affect you that much. I mean, your bag could stick out another two or four or six inches out the back, and it would just stick out. But it wouldn’t affect how you play, really, in terms of the diameter. That’s the important dimension. And it is very slightly bigger in diameter, the extended small. The next size up from that used to be a medium.
But a medium is pretty huge. So what Willie McCallum did is he took the back of the bag, the deeper part that’s back behind here, is to a medium. But the front part is closer to a smaller extended small.
So it’s kind of like the best of both worlds. And I think a lot of people really like that. It’s a slightly larger bag than the smaller extended small. But the front part, the part where your arm goes, where it kind of tapers up and comes to the narrow point, that tapers more and tapers farther back.
So the idea here is that you can still get that bag pretty far up in your armpit, and you don’t have the bag pressing on your forearm. So it is a very popular bag. It’s too big for me. In fact, even for me, I could play the extended small, but I really just like the small.
When you look, if you can find any measurements of the bag dimensions, I think the small is somewhere off to confirm this. But I think the small, if you flatten it, is 9 inches.
So that’s what you’re talking about there. Now, for my son who’s learning to play the pipes, I worked with Bannatyne, and I got a custom, super, super small bag. And it’s really small. Like, you fill it up, you cork it up, and it’s like, “wow, that’s really tiny.” But it’s perfect for him. And in other instruments, they have options for tiny people. So you can learn to play the violin when you’re a toddler, and people do, like the Suzuki method. And you have a violin that fits your body.
And then they have names like full size, 3-quarter, half size, quarter size. I don’t know how far it goes down. But you get a little, little tiny toddler kid who can be learning the violin, and it will be sized to fit them.
We don’t have that in bagpipes. The drones are just huge. The pipe chanters are huge. But what you can do is get a pipe bag that fits you. So if you’re a smaller person, go with the small. One other issue, and this came up in the question, which was, what about the dimensions from the drones to the chanter?
So with these different sizes of pipe bags, there’s a little bit of a bigger length there with the distance from the drone to the chanter. So you think about it. You’ve got your drone stocks here. You push your bag up. The drone stocks, you know, if this is my base drone, it’s pretty much on my chest. And then whatever the distance of the bag is, that’s where my arms are going to be.
So I have run into this a few times with piping students, which is they really love the size of their bag, but in terms of the size under their arm, the distance here isn’t right. It’s too close. And this sometimes happens with people who have longer arms. So you would know that based on just your life experience and finding clothes that fit and that sort of thing. If you have arms that are a little bit longer, with these smaller bags, it can feel very comfortable in terms of squeezing with the arm.
But you can feel like you’re a little bit scrunched in here. And that’s not good. So Bannatyne has made a custom bag for me. And I don’t have these for sale on my website yet. And I should add them. I’m going to make a note here. I think I got an extended small bag, but I added some extra length to the neck. So as far as the bag feels under your arm, it’s identical to an extended small.
But for people with longer arms, it comes out this way. I got the idea from a student. He said he had never found a bag that was comfortable and tried so many different bags, sizes, different mixes to try to find one that worked. And we sort of figured out this issue that, oh, everything was perfect except for his arms were just a little bit too long to be comfortable. So we ordered this custom bag. And he loves it. He totally loves it.
He says it’s the most comfortable bag he’s ever played. And then I ran into another piper friend here in town who was communicating some issues with his pipe bag, and I mentioned this extended neck, this bag with the extended neck length. And he said, let’s do it. So I actually ordered a handful of these. I think I have five of them now. So if you’ve struggled with bag comfort relative, as it concerns your arm length, and you want a little bit more distance there, shoot me an email through my website, BagpipeLessons.com or find me on social or put a comment here in the video. And I can get you one of these bags. Really, really cool idea. The other thing just to wrap up this ergonomics, this brief ergonomics conversation that we’re having here is blowpipe length is really, really important. The reason blowpipe length is important is that the length of the blowpipe is going to determine the position where that bag is, relative to your mouth. Because if you stand here, imagine I’ve got my set of pipes here. My arms are going to be in this position. My body is the length that it is. So the distance from my mouth to about right here, that’s going to be determined by the blowpipe. My blowpipe was too short.
I would either have to bring my head down, which is no good, or I’d have to bring my pipes up. On the other side, if my blowpipe is too long, I would have to bring my head way back. That’s also no good, or I’d have to drop my pipes further down.
So this distance is pretty much determined by your body and the length of your body and your neck and your chest to your arm ratio and all that stuff. So you have a little bit of room there. But if you look at top pipers, (just get online and search for the name of your favorite top piper, or go to my website and look at pictures of me playing), you will see most top pipers, when they’re playing, their forearms are horizontal or just a little bit down. But they’re not this, and they’re not this. This you see a lot of amateur players where their forearms come way down.
Now, there are examples, and in any field of music or sports, there will be people that have unusual or non-standard form. But I’m talking generally 99 out of 100 professional players. These arms are going to be like this, but amateurs, you’ll often see like this.
I look at pictures of me from when I was a kid, before we figured all this stuff out, before we had all these options for different length blowpipes and I’m playing like this. Or sometimes you see a piper where their head is really turning away because that blowpipe is like four inches too long.
So they’re way over here. So take a look at yourself, take a picture of yourself playing, or get in front of the mirror. You should be able to stand with a neutral position, which means, okay, this is you, then this is you with your bagpipes, right?
You don’t want to have to be craning your neck forward or back or going this way or reaching down. So another fun thing that you can do is flip on your camera in your phone or computer or whatever, and just record and just play your pipes, and turn sideways and turn around and march around and get all angles, and you will learn something. Playing in front of the mirror is good, but there’s limits to what you can see from the different angles. But watch the video and you may notice, “Well, my head’s coming a little bit forward. My head’s coming a little bit this way. My shoulder’s coming a little bit up or I’m reaching a little bit down.” These are all signs that you have some additional comfort that you’ll be able to experience and stamina and you’ll probably be able to play cleaner, keep steady your bag pressure because your body will work so much better and easier if things fit you properly.
I mean, that goes for having shoes that fit. If you play other types of sports where equipment sizing is important, skis, golf clubs, that sort of thing. When it fits with your body, it works the way it’s designed to work. It makes everything much easier. The great news is that there are some really good adjustable length blowpipes out there. I’ve got one in my shop made by R .G. Hardie. It’s called the AdjustiStick. Adjusti as in adjustable, and Stick as in blow stick. And it’s a really cool blowpipe. It has a great valve built inside so you don’t have to deal with those little rubber valves with the piece of metal that are constantly leaking and malfunctioning and breaking and needing to be replaced.
It’s got an amazing valve inside, and it’s got a telescoping length. So the R.G. Hardie Poly or the plastic bagpipes come with that. It’s a really cool option. If you’re in a pipe band or you’re in a community of pipers, maybe you can borrow an adjustable length blow stick from someone. Try it out for a week or two, see if there’s a position or a length of blowpipe that is more comfortable than what you have.
And then maybe you can buy one of those adjustable blowpipes, or you can buy that from your friend, or then you know the length that is going to be good for you. And then you can take your blowpipe, which you already have, which is not adjustable, and get a shorter mouthpiece.
The mouthpieces are removable and you can get those in different lengths. Or you can maybe cut it off a little bit. Sometimes you can cut off a little bit of plastic there or grind it off and then just get that little bit of a shorter blowpipe.
For really short people, there are some great options. John Walsh has an adjustable length blowpipe for kids, and it’s really, really short. And that is great. If you’re shorter in stature, say you’re 5’5” or shorter, that’s a great option because when it’s at its shortest length, you’ll be able to find the sweet spot for you.
So big topic. I should probably do a whole video for the channel about ergonomics. But the basic idea is you have a body. You use your body to play your instrument. And everything that you can do to have your pipes fit you, it’s going to make everything that more comfortable.
We have “Wolf Dragon Donna” in the comments saying, “in my experience as a short person, it’s not just the blowpipe length that’s important. It’s also how far down the chanter hangs. You can use the blowpipe stock to lift it in bag size, which is crucial.”
That is a very good point. I didn’t mention that. So the way that your stocks go into your pipe bag, thank you, Donna. That’s a great comment. The drone stocks and the blowpipe stock just kind of pop into the grommets.
But the way that the chanter stock goes is it’s just an open sleeve. And you can place that stock deeper into that sleeve or have it hanging out more depending on getting that length. So again, that is another tool or that’s another area of potential improvement that you might be able to find.
If you get your blowpipe length the right length, then you can pop that stock a little bit deeper into the bag. So it’s just the chanter’s up a little bit higher. Here’s something you can try. If you feel like your bag is the right length, sorry, your bag is the right size and your blowpipe’s the right length, so you’ve got a good ergonomic position here, well, just put your hands here where you feel they’re the most comfortable.
Don’t go for the holes because what we’re trying to find is, is the chanter at the right depth? Just kind of just put your hands up. OK, this feels about right. And then you look down and you find, well, my chanter is actually down here.
I actually want to be higher than my chanter is. It would be better if my chanter was up. So what you can do there is you can get a little bit of depth adjustment with your chanter stock. So cool. Great, thanks for the comment there, Donna.
So a lot of questions over the years about the birl, and that is a really important movement. So if you haven’t checked out my Bagpipe Essentials Masterclass, I have a huge video all on the birl and how to play that perfect birl.
So check that out at BagpipeLessons.com/masterclass. I released that, gosh, was it just last month? And it’s got 31 videos on all the essentials of bagpipe technique and a specific video on every doubling, gracenote, strike, birl, taorluath, and that sort of thing.
And people give some great feedback about that course. But one of the things about the birl, there are multiple styles of birl. And the one that I recommend and the one that I play is called the seven. And it’s where you touch the chanter, slide down, and pull back.
There are other types of birls that involve tapping. The tapping birl is the double tap, drag, the up, down, the down, up. The seven birl is by far the most popular birl with good pipers, and the reason is that the seven birl, although it’s harder to learn initially, it takes a little bit of extra work at the beginning, it’s way more reliable.
It gets you the sound that you need. And when you get into the really cool, slightly more advanced tunes, you get birls from notes like B and C and low G. Those are way harder than just your regular birl from low A. So what you end up having to do is play the seven birl. That’s the way to get the most reliability. It’s very hard to play those birls from B, low G, C, without playing the seven. It’s possible, but the world’s top pipers have figured out that that’s a type of birl that’s worth the effort. So the way you play it is you play low way.
You touch your finger on the chanter, slide down, and then slide up and pull back. So it’s touch. I’m not on the hole. I’m just touching the chanter. Slide down, and then slide down, slide up and back.
And they call it the seven because if you were to draw out what the tip of your finger does, it goes down, and then it comes back, and it looks like a seven. Kind of want to be a little bit of a curvy European seven.
So call it the seven birl. I would love to know who invented that. I don’t know if that is a mystery that can be solved. I imagine it just goes back too far in time. But one of the challenges is that it takes some range of motion.
So you have to be able to do this, and most people can flare a hand like that, but to play the seven birl, these three fingers stay in position, and then the pinky needs to go down. So that is a challenge there is to get that range of motion.
So you can just practice that. Do your barking dog shadow puppetry. Another thing you can do is take your left hand, make a fist, and we’re going to use this knuckle here to practice our birl, and then you take your hand and put it here, and then you just do this.
So as if the hole was here, but that little bit of a bump gives it a little bit extra work, and do that. Another thing you can do, if you have a rubber band at home, I like these sort of thicker rubber bands that you sometimes find on produce, vegetables, and just put it around your hand and practice your birls that way.
Well, it’s not really the birl, but you’re practicing getting that range of motion. So again, we’re not spreading our hand out. We’re keeping these three (fingers) in position, and feel free to use your other hand to keep those in position and do that.
I also like to do it on a tabletop. Do this rubber band thing on a flat surface, and instead of your pinky flying out and kind of going up, you want to be pushing down. So if it’s pushing down, here’s my, use my Tone Protector reeds here, like a tabletop, you can just practice like this.
So you’re getting that range of motion while pushing down on a surface, because that’s what you’re doing on the chanter. So that’s the seven birl. Often I hear from students, “Oh my gosh, I can’t do this. Is it possible that there’s something about my anatomy or my hand that just doesn’t make it possible to do this?” Or I’ll be teaching a workshop somewhere and I’ll be talking about the birl and the seven birl. And there’ll be people who have been playing for quite a long time. And they will say, well, I tried to learn the seven. It just didn’t work for me. So that’s why I do this other one. Or my finger locks, or I just don’t have the range of motion. And it’s possible, it’s possible that you have some anatomical thing that makes it difficult or impossible to do the seven. I haven’t met anybody like that yet. I’ve met a lot of people who think they can’t do it.
But I think a lot of times what happens is that your hands are really tight on the chanter. And the tighter you get, the less finger independence you have. Take anybody, even a non-piper, no problem moving the fingers independently. But as soon as you get on that chanter and you’re trying to cover those holes and you’re death-gripping it, you lose the finger independence.
Dr. Mark’s got a question. What about the ring finger moving? Great, so that was my next point. So for the seven, you tap, you slide down. So we talked about that. Now you’ve got to pull up and back. Now see, my ring finger moves. As soon as I curl my pinky, that ring finger moves.
I’ve never met anybody who can pull the pinky in without moving that finger. It’s just how it is. It’s for everybody. Put your hand on your table there. Scratch with it, pointer, middle, ring finger, pinky.
The ring finger and the pinky want to move together. Try to bring that pinky in without moving the ring finger. It’s not happening, but that’s okay. That’s okay. The ring finger is allowed to move as long as it doesn’t come off the hole, right?
Now if you’re doing this, it’s too much, it’s not going to work. This finger needs to stay on the hole even if it moves a little bit. Again, get on YouTube to find videos of your favorite world-class piper. You will see they’re playing the seven birl most likely, and you will see that when they do that pull back. The ring finger does move a little bit, but it doesn’t make a sound. It’s totally okay it’s totally normal because it doesn’t come off the hole.
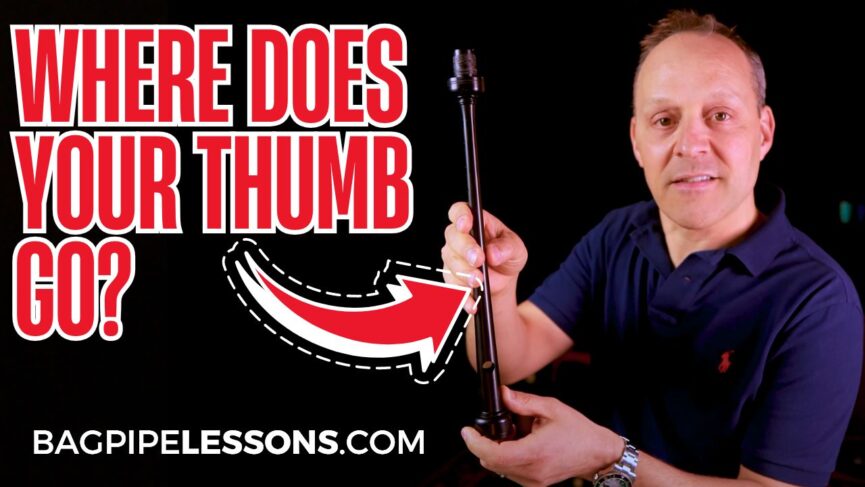
So how do you minimize it? Keep your hands as relaxed as possible. The other thing I will say that is crucial is the position of your thumb. Where does your thumb go on the back of the chanter? Your thumb on your bottom hand is the only digit that’s on the chanter that does not have a hole to tell it where to go right?
Every other finger, this pinky is just floating in space, every other, your thumb and your other seven fingers all have a hole, the thumb doesn’t have a hole, where does it go? Well before I tell you the answer where I would say it should go, put your hands on your chanter. Put your hands on a pencil, put your hands somewhere, and just put it in your natural position, and look where your thumb is.
Is it up here behind the pointer finger or between the pointer in the middle? Is it even with the middle finger? Is it between the middle and the ring finger? Is it the ring finger or lower? Where is it?
Most top pipers have it in the exact same spot right in between the middle and the ring finger. That’s the secret spot. If your thumb is higher, and you try to move it down, it’s going to feel weird. That doesn’t mean it’s wrong, it just means you’re used to having it up there, and when you move it down, you’re going to feel a little bit of tightness in this muscle here. That’s totally okay. That will go away maybe in a week, maybe in a couple weeks. But the reason you want to have it there, is you use your thumb as a helper for all your other fingers. So put your thumb there, do this with your chanter, when you put your thumb way up here, it’s almost impossible to keep any kind of balance there. You just really want to flip out of place, and then also you just, it’s the balance is completely lost. So having your thumb in the right position, low enough, will help you with that birl because it helps you keep that ring finger in position. Not by squeezing, but by having everything balanced.
I would recommend to you if you like piping and you want to feel confident and comfortable with your technique as it relates to your birl, it’s worth investing the time in the birl. (The) first 10 years of my piping career I played a different style of birl which was the one my teacher taught me. And it just never got very good, and finally I got over my resistance to switching birls because I was not wanting to have to switch an important part of my technique. Because I knew it would get worse before it got better, but I finally got frustrated enough where I switched to the seven birl. And I’m so glad, I’ll play any tune with the birl now. Birls from C, birls from B, birls from low G, lots of birls fast, hearings in my piobreachd. I fear no birl and you can get that as well. Thumb position: keeping the hands relaxed.
Working on that birl step-by-step, check out my masterclass. It’s got a great video on the birl, I think you’ll really like it.
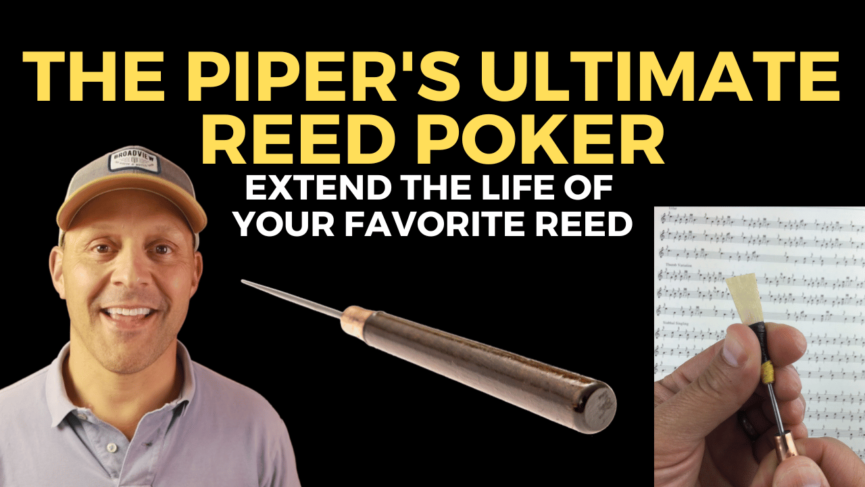
Great, we got a question from Dennis about what’s the great magic solution to breaking in reeds? I’m up against the deadline here for time, but I would say the Tone Protector Reed Case: this is my product, it’s won a lot of awards, it’s very popular. I was shocked at how much work this case does for breaking in reeds. In fact it seems to me that most of what we talk about, most of the experience that we struggle with when we’re breaking in reeds, is really getting the reed to the right moisture level. (In) the old days, we’d have dried out reeds, and these reeds are drying out. You lick them, and then you pinch them, and you mess around with them, and then they get wet, and then they dry out again, and it’s just a cycle. And it damages the reeds, and it makes them unstable. I’m still amazed to this day, and this reed case has been out for many years now, how instant it can be when I pull a reed out of here.
It’s the right strength. It’s vibrating right, and I pop it in there. And it’s there. It’s kind of amazing. So of course, you’ve got to have a good reed. You’ve got to have efficient reeds. If you’re looking for a really good reed, and you’ve been struggling with reeds, check out my Foundation reed.
My Foundation reed is only available in my shop. I get it from one of the world’s top reed makers. He makes me a special reed. They cost more than other reeds. That’s because there’s extra quality and extra selection time and attention that goes into these reeds. Every reed is stored and shipped in a humidity sealed device. They get mailed to me from my reed maker in these. I let them stabilize, and then I pick every single reed myself, put it in a sealed container, and mail it to you.
If you need one reed, you buy one reed. If you need four, you buy four. You don’t need to buy a dozen to try to get one good one. But the key is, when you get your Foundation reed, you have to have a Tone Protector, or else you’re not going to get the full benefit of having this reed, which has been humidity stabilized through its entire lifespan.
So get a Tone Protector Reed Case, or get the Tone Protector cap on your chanter and keep it in there. That’s the biggest secret, I can say, in terms of having reeds that sound good, feel good, stay in tune, last a long time, are efficient to play, and have very little break in time.
It’s a good reed, but it has the optimal humidity level in the cane, and the only way to get that is to store the reed in an environment where it’s getting the right amount of humidity. It’s not drying out.
Cool. Well, thanks, everybody. Thanks for the comments. And if you’re watching this on the replay, throw some comments in there. Check out my BagpipeLessons.com Inner Circle. It’s a membership where I do weekly online group classes for my members, and I have a lesson library with hundreds and hundreds of videos, lessons, tunes, product demonstrations on every piping topic you can imagine: maintenance, setup, tuning, reeds, bags, blowing steady, musical expression, composition, piobreachd, all that stuff. So check it out at BagpipeLessons.com/membership. Have a great Friday, have a great weekend, and we’ll see you next time.
This has been really fun. Thanks, everybody.
WATCH More Videos