

By Jori Chisholm • BagpipeLessons.com
Prefer the printable PDF? Download the free guide here — or keep reading for the whole thing below.
One of the great joys of piping is the experience of playing when the fullness and resonance of your bagpipe sound is at its full potential. It is also one of the greatest challenges of piping, as it involves many disparate elements of equipment, reed selection, adjustment, maintenance, blowing and squeezing, timing, strategy, stamina, endurance, listening, focus and concentration. One of the great joys of teaching is to be able to share this experience with my students: first they get to hear it and then they can experience it first-hand through their own playing.
At the world’s elite solo competitions, a brilliant, rich, full, “locked-in” drone sound with a sweet, bright and perfectly tuned chanter is required for even a chance to make the prize list. The winning players at the top events like Oban and Inverness likely spend as much time refining their sound as they do mastering their tunes and perfecting fingering technique. Several years ago, a gold medal-winning Scottish piper told me “to win the big prizes, it’s not enough for your pipes to sound good. They have to sound brilliant!”
To achieve a fantastic drone sound, you must ensure you have good reeds that are properly set up, adjusted and maintained.
Watch the video: Drone Reed Secrets Revealed
The short version
Setting up drone reeds is three steps: fit the reeds snugly into the drones with hemp or floss, adjust the bridles until each reed takes the least air possible without shutting off, and adjust the tuning screws so your drones tune in the optimal position.
The bridle controls how much air a reed uses. Moving it towards the vibrating end of the tongue closes the reed down and it takes less air. Moving it away opens the reed and it takes more air. Adjust in 1 mm increments — these are far more sensitive than they look.
Aim to tune with 1/8″ to 1/2″ of hemp showing on the tenors and bass top, and 1/2″ to 1 1/4″ above the projecting mount on the bass bottom. That maximises the wide-bore section and gives the most stable tone.
What follows: setup (fitting the reeds, adjusting the airflow, adjusting the pitch), maintenance (keeping them dry, handling the tongue and bridle, storage), a recap, and answers to the questions pipers ask most.
Setup
Setting up new drone reeds involves three steps: fitting the reeds into your drones, adjusting the airflow to find the “sweet spot” and adjusting the pitch.
Fitting the Reeds Into Your Drones
It’s important that your reeds fit snugly into the drones. This ensures that there is no air leakage and keeps the reeds from falling out. A tight seal also produces a steadier tone that is easier to tune. Wrap the bottom of the reed with your choice of waxed hemp or dental floss and test it in the drone until it’s tight. Note: do not use Teflon plumbers tape, which is designed to be slippery. My preference is for the drone reed to be as deep as possible while leaving a very small gap between the hemped part of the reed and the main body of the reed. Repeat for all three drones.
Adjusting the Airflow to Find the “Sweet Spot”
The chanter reed determines how hard your pipes are, which determines the air pressure you need to maintain while playing. Adjust the bridles on all three of your drone reeds so they take enough air to stay on while you play while also making your pipes as efficient as possible. I call this the “sweet spot.”
We achieve this by adjusting the bridles until we find that sweet spot where they take the least amount of air possible and are not shutting off while playing.
Essentially, you are looking for two factors: first, a drone and reed combination that gives you a steady sound that is easy to tune; and secondly, that each drone makes two tones — a first tone with lower pressure and a second tone with the full pressure achieved when your chanter kicks in.
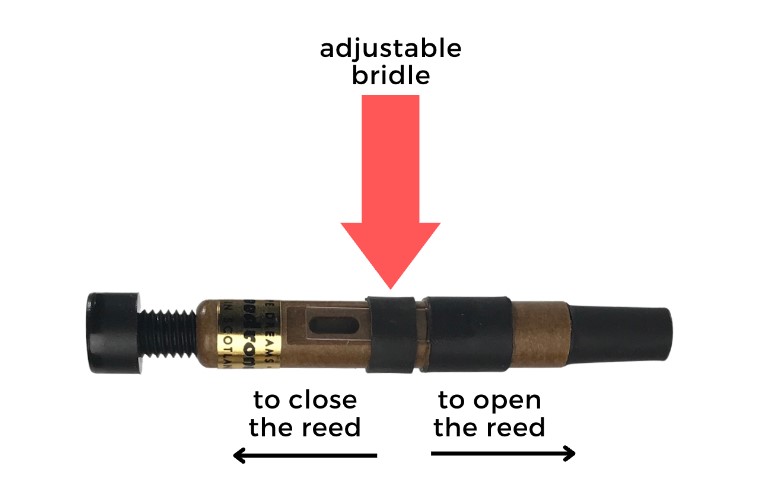
The drone reed has a rubber band bridle that can be moved to change the amount of air it uses. The reed has a small tongue that’s attached at one end and vibrates freely on the other. When you move the bridle towards the free end of the reed tongue, the space between tongue and the reed is reduced and the reed takes less air. Accordingly, when you move the bridle away from the free end of the reed tongue, the space between tongue and the reed is enlarged and the reed takes more air.
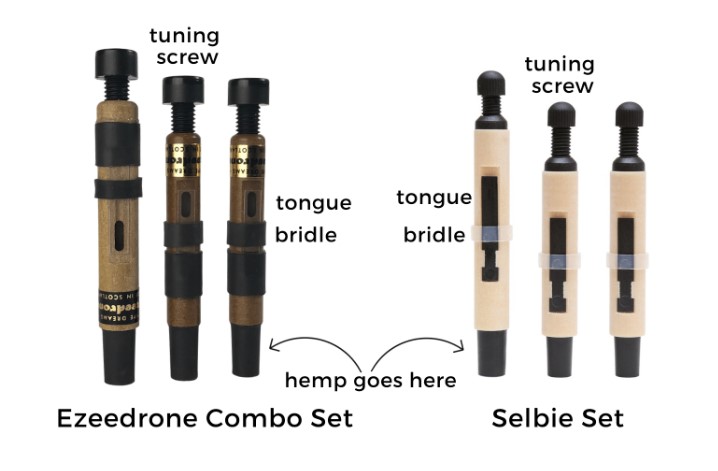
IMPORTANT NOTE: reed bridles are very sensitive to tiny adjustments. Any adjustments should be very, very small — 1 mm at a time.
PRO TIP: before you make any adjustments, use a pencil or fine tipped permanent marker to draw lines on the reed to mark the default factory settings for the reed. This will allow you to use the markings to go back to the original adjustment position if necessary.
Put your pipes together with your new drone reeds installed as well as your chanter. Play your pipes and see what happens.
If any of the drones shut off, open up the reed by moving the bridle a small amount, then try again. Do one drone at a time until they all keep going when you play.
If the drones keep going when you play, great! You can stop here and enjoy your new drone reeds. However, if you want to make your pipes even more efficient and comfortable, adjust the bridle on one drone to close it down a tiny amount, then play your pipes to test. If the drones keep going — great! You can repeat this process and keep closing the reed down in tiny increments. If you keep going, the reed will eventually shut down when you play. Open it up a tiny amount at that point — you have found the sweet spot! Repeat this process until you’ve found the sweet spot for all three drones.
Remember that the idea is to find the sweet spot where each drone is closed down as much as possible without shutting off when you play.
| Problem | Action | Result |
|---|---|---|
| Drone is taking too much air. Pipes are too hard. Drone is double-toning (e.g., fluttering). Drone won’t kick into second tone. | Move bridle towards vibrating end of the tongue, i.e., “closing the reed down.” | Makes the space between the tongue and reed smaller. Makes the reed take less air. Makes the reed operate at a lower pressure. |
| Drone is shutting off. | Move bridle away from vibrating end of the tongue, i.e., “opening the reed.” | Makes the space between the tongue and reed larger. Makes the reed take more air. Makes the reed operate at a higher pressure. |
Adjusting the Pitch
The tuning screw at the end of each drone reed allows you to adjust the pitch of the reed so your drones tune at the optimal position. Most pipes sound best and are most stable when they tune at the following positions:
- Tenor Drones: 1/8″ to 1/2″ hemp showing
- Bass Drone Top Section: 1/8″ to 1/2″ hemp showing
- Bass Drone Bottom Section: 1/2″ to 1 1/4″ above the projecting mount (“one or two fingers”)
These drone tuning positions maximize the length of the wide bore section inside the drones. This gives the drones the best sound and most stable tone.
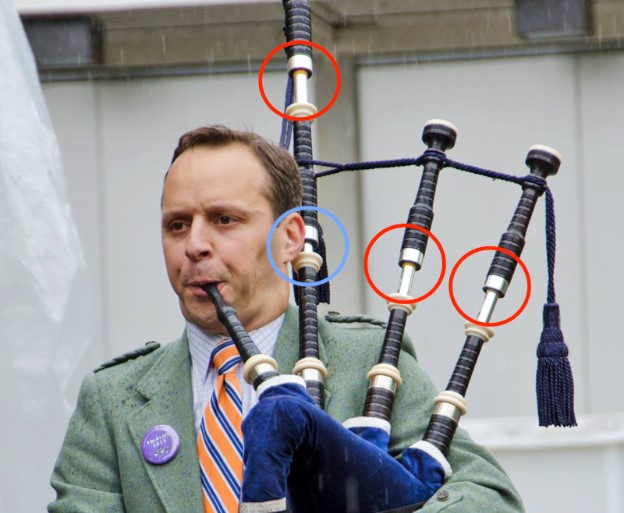
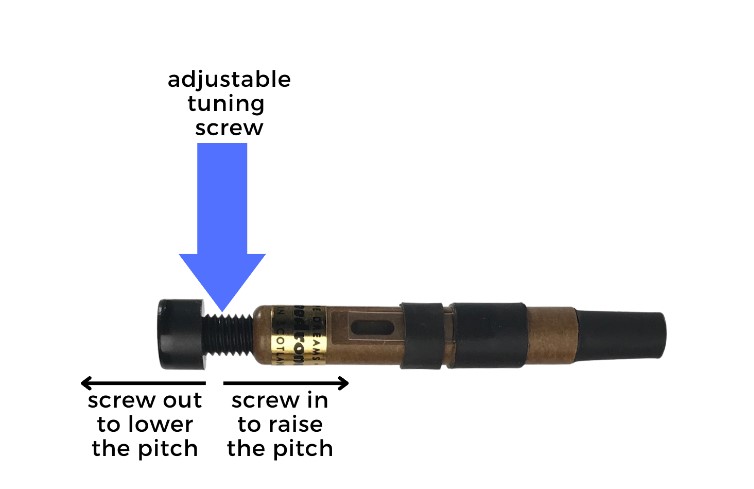
Play your pipes, get warmed up, and tune your drones. Get the drones in tune with each other and with your Low A. Stop and look at where they’re tuning. If the drones are not tuning in the optimal location, make adjustments to the tuning screws.
| Problem | Action | Result |
|---|---|---|
| Drone tuning too high. | Move the screw out. | Makes the reed lower pitched so when you retune the drones, it tunes in a lower position. |
| Drone tuning too low. | Move the screw in. | Makes the reed higher pitched so when you retune the drones, it tunes in a higher position. |
Maintenance
When set up and properly maintained, your new drone reeds will give you a consistent tone that stays in tune and lasts a long time. Here is what helps, and what does the damage.
Keep them dry
Use a moisture control system like the Dri-Flo. A good moisture control system keeps your reeds dry when you play. Reeds are somewhat resistant to moisture, but they operate best when warm and dry. Moisture makes pipes go out of tune and attracts dust and other particles that eventually make reeds unstable and non-working.
Be gentle with the tongue and the bridle
The tongues and bridles are sensitive to small adjustments, so don’t touch either unnecessarily. Never flick the tongue of your reeds. And don’t fiddle with the bridles once they are right — get them set up and leave them. They shouldn’t need much more adjustment.
Store them somewhere safe
If you take the reeds out of your pipes, keep them in a safe storage case or box. Don’t leave them in the bottom of your pipe case where they will be banged around.
Recap
By following these steps to install and adjust your reeds, you should get many hours of enjoyment from your new drone reeds. First, add hemp or floss to make sure the reeds stay snug in your drones. Then adjust the bridles, if needed, to make sure the reeds stay on when you play but use the least amount of air. Then tune your pipes and make adjustments to the tuning screws so your pipes tune in the optimal location. Finally, use a moisture control system and be careful and gentle with your reeds to help them last.
Please let me know if you have any questions!
Related Guides
- How to Achieve a World Class Bagpipe Sound — where drone reeds fit into the bigger picture of tone.
- The 80/20 Rule for Steady Bagpipe Blowing — steady pressure is what keeps your drones locked in.
- Secrets for Making Your Pipes Easy to Play — make the whole instrument more efficient.
Frequently Asked Questions
How do I stop my drone reeds falling out or leaking air?
Wrap the bottom of the reed with waxed hemp or dental floss and test the fit until it is snug. Do not use Teflon plumbers tape — it is designed to be slippery. A tight seal also gives a steadier tone that is easier to tune.
What does the bridle on a drone reed do?
The bridle controls how much air the reed uses. Moving it towards the vibrating end of the tongue closes the reed down, so it takes less air and runs at lower pressure. Moving it away opens the reed, so it takes more air and runs at higher pressure.
Why does my drone keep shutting off?
The reed is closed down too far for the pressure you are playing at. Move the bridle away from the vibrating end of the tongue by about 1 mm to open the reed slightly, then test again.
Where should my drones tune?
Tenor drones and the bass drone top section should tune with 1/8″ to 1/2″ of hemp showing. The bass drone bottom section should sit 1/2″ to 1 1/4″ above the projecting mount — about one or two fingers. If they tune elsewhere, adjust the tuning screws.
How do I make my drone reeds last longer?
Be gentle with the tongue and bridle, never flick the tongue, store reeds in a case rather than loose in your pipe case, and use a moisture control system so the reeds stay warm and dry while you play.
Want to Learn More?
Join my BagpipeLessons.com Inner Circle. It’s the ultimate way to learn faster and find greater enjoyment in your piping. You’ll get access to weekly LIVE online classes where you can get fast answers to your questions, plus unlimited access to my massive Online Lesson Library with hundreds of hours of recorded lessons, tunes, and workshops. Join a supportive community of pipers from around the world and start reaching your full potential today.
Want the printable PDF version of this guide? Download it free here.
About Jori Chisholm
Jori Chisholm is a world-renowned American professional bagpipe player and teacher. He played with the six-time Grade One World Champion Simon Fraser University Pipe Band for 19 years and was a featured solo performer for the band on multiple occasions. He is a successful solo competitor, winning the United States Gold Medal four times and winning top prizes at many top competitions including the Northern Meeting at Inverness, the Argyllshire Gathering in Oban, the Royal Braemar Gathering, and the Cowal Highland Gathering.
Jori started BagpipeLessons.com in 1999, in hopes of bringing pipers of all levels and experience valuable, trusted information, tools, support, and inspiration. In 2003, Jori was the first piper to teach bagpipes online. He has been featured in a New York Times front page story about the growth of online music lessons. Jori also founded the world’s first online-only piping and drumming competition, the World Piping and Drumming Championships, which has become a highly popular and celebrated event.
Jori has invented several popular, award-winning, and patented products for pipers including the Tone Protector™ chanter cap with two-way humidity control, the Tone Protector™ Reed Case, InTune Mic™, the Bagpipe Gauge, the Piper’s Ultimate Reed Poker, the Piper’s Advantage™ Bagpipe Phone Mount, and the Piper’s Metronome™. Jori lives in Seattle, Washington with his wife and two sons and enjoys traveling, exploring the great outdoors, and of course, music of all kinds.