AS FEATURED IN

LIVE Q&A: Fixing a Chirping Reed, Improving Dexterity, Upcoming Events in Seattle and Dallas, Texas
by Jori Chisholm, Founder of BagpipeLessons.com
Last Updated: September 25, 2024
In today’s live session I will answer your bagpipe-related questions, including how to fix a chirping chanter reed, how to improve your finger dexterity with some stretches and exercises, and I share some updates on upcoming events in Seattle and Dallas and exciting news about an upcoming product release.
Helpful Links:
- Seattle Show with Carlos Núñez October 12
- Tartan and Taps in Dallas, Texas, October 24-27
- BagpipeLessons.com Precision Tuning Tool Kit
- The Piper’s Ultimate Reed Poker
- Greg Irwin Finger Yoga Exercises
Watch the video and scroll down to read a summary or the full video script.
Key Points
🎵 Upcoming Concert: Jori will perform with Carlos Núñez on October 12th at Seattle’s Town Hall, showcasing Carlos’ masterful Galician Gaita playing.
🎶 Tartan and Taps: A bagpipe event in Dallas from October 24th-27th where Jori will teach courses, focusing on pipers of all skill levels, especially police and firefighter bands.
New Product Tease: Jori hints at a new, innovative product for pipers expected to launch by the end of October.
💡 Reed Chirping Solutions: Common causes of reed chirping include the reed being too easy, dryness, or excessive tape on the chanter holes.
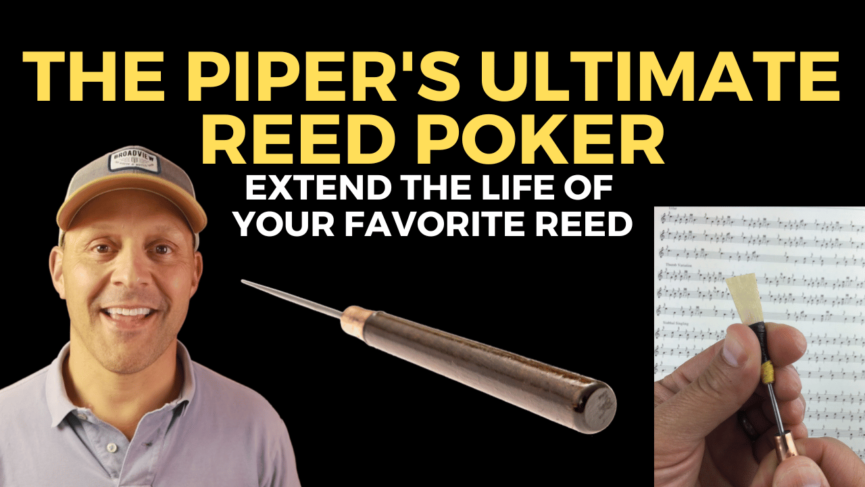
🪛 Piper’s Ultimate Reed Poker: A tool Jori recommends for extending reed life by making the reed stronger and fixing sharpness issues.
💧 Humidity Management: The Tone Protector helps maintain optimal moisture levels for reeds, which is crucial for consistent pChanter Alignment: Ensuring the chanter is correctly aligned with the stock helps avoid issues like chirping and squealing.
Hand Stretches and Exercises: Jori suggests exercises and stretches to improve finger dexterity and maintain soft hands for better technique.
📚 BagpipeLessons Membership: Offers access to a library of lessons, live Zoom classes, and resources for pipers of all levels.
Subscribe for More: Jori encourages viewers to subscribe to his channel and join his BagpipeLessons.com Inner Circle for in-depth learning and community support.
Video Transcript: Hey everybody, thanks for tuning in. I’m Jori Chisholm from BagpipeLessons.com and I’m coming to you live today from my kitchen. So just sitting here and for those of you who watch my YouTube channel, you know that I have my cool studio, which is here at the house, but there’s no windows down there. And sometimes I get a little sick of being in my basement studio bunker set up there. It’s got great lighting and camera and everything, but sometimes just get a little bit sick of being down there without any light.
So it’s going to be fall here in Seattle, but kind of a nice day out there today. So I’m coming to you from my kitchen. So I got a couple quick updates for you about some live events that are coming up in the next few weeks. Next month on October 12th, I’m going to be piping in Seattle with Carlos Núñez at Seattle’s Town Hall. So if you know Carlos Núñez and you’ve seen some of his videos or heard his CDs, you know how totally amazing he is. He is, in my opinion, the undisputed master of the Galician Gaita, which is from Spain, the bagpipe from the north of Spain in Galicia. And I’ve played with Carlos a bunch of times and he’s one of the most virtuosic and exciting performers that you will see anywhere. And it’s fantastic that he’s coming back to Seattle after several years, and I’m just really thrilled to get to play with him again. So I’ll put some links below to some of my favorite videos with Carlos, but he’s just completely amazing, totally virtuosic, amazing. And he’s got his whole band, his brother Xurxo Núñez on drums, Pancho Álvarez on guitar, and usually some fiddlers. And I think the Pilatzke brothers have been touring with him on fiddle and dancing, just an amazing show. And yeah, Carlos is just a real talent. And we’re lucky that the Spanish consulate here in Seattle, who’s a big supporter of Carlos, is bringing him to town for a town hall. So that’s August 12. Carlos is also doing a show in Chicago, and I think New York City. So if you’re in any one of those places, you’ve got to go, he is totally amazing. So check out his website, I’ll put the link down there too.
But if you’re in Seattle, please come out, be happy to see you. I’m going to be playing and bringing some other local pipers to join me there. Cool. Next thing I’ve got to tell you about is Tartan and Taps, which is a very cool piping and drumming and pipe band event that is going to be happening in Dallas. I’m going to be teaching there and that is October 24th through the 27th. That’s a Friday, Saturday, Sunday in Dallas. And the website for that is TNTWaco.com. The first one of these Tartan and Taps events they did in Waco. So TNTWaco.com, I’ll put the link below. And it’s open to all pipers and drummers of all ability levels. It’s kind of focused on firefighters and police bands, although it’s open to everybody. So check that out. I’m going to be teaching some courses and it’s a really fun event. This is my first time going and teaching there, but I’ve heard all about it. And there’s a lot of opportunities for meeting other pipers and drummers and socializing and also getting a lot of practice in terms of performing. So we’re going into town and checking out some of the nightlife there and playing as well. So I look forward to that. That is in Dallas, October 24th through the 27th.
The last sort of news announcement I have is going to be a little bit of a tease, but I am looking at launching a new product, and I’m shooting for having it out in about a month, by the end of October. And this is a very cool product that I think every single piper is going to want. And there’s nothing like this that is available in the world today. I’m very excited to collaborate with a company that is extremely well known in the world. And anyway, that’s all I’m going to say for now, but stay tuned for what’s coming up from BagpipeLessons.com and me with the new product that, pipers, you’re going to want one of these. So stay tuned for that.
If you are watching on the live stream, go ahead and pop in the chat, and say where you’re from. Introduce yourself, and if you have any questions, if you’re watching the replay on YouTube, and you’re not catching me live, that’s fine. I can still see your questions, so go ahead and pop in a question or comment there and I’ll answer it either in the comments, or I will address it in a future video.
I got a question today: “The chanter reed in both my band chanter and my secondary chanter both seem to be chirping when I play a high G gracenote. Is that a fingering issue? Do they need to be poked? Something else that I’m doing wrong?” So that is a great question. It can be several things.
So what happens when a reed is chirping is that instead of getting that nice clean G gracenote sound, you get that chirp or squeal. Sometimes the squeal lasts longer. But a chirp can be just like a higher, higher pitched sound instead of that normal high G gracenote sound. These are the things that can cause it. One is that the reed is too easy. And that could be that the reed is just, it can’t handle the pressure that you’re giving it. So whatever pressure that you’re blowing, your pipes could be comfortable for you, but the reed has just gotten too easy, and that’s one of the signs. Another sign that the reed is too easy will be it’ll be sharp overall, especially on the top hand. And sometimes you get what we call a thin top hand. Or just a thin sound overall, which means it’s a little bit quiet and it’s not projecting. So when the reed is too easy, that could mean that you need to get a new reed. Or it could mean that the reed can be saved, and you can extend the life of your reed and get some really good additional playing time out of the reed if you poke it.
So what you need is a special tool that will open up the read from the inside. So the way that the cane blades work is that they are touching on the sides, but then it’s open in the middle. These are the cane blades of the reed. And the cane blades are wrapped around a metal tube that we call a staple. And that staple can be brass or copper. So you have the soft cane blades, which are tied with that wrapping around that metal tube. So what you can do is if you have a poker, which is a specialty tool that allows you to insert inside the bottom of the reed, and what it will do is it will open up that staple just a little bit, and it’ll spread those cane blades of the reed apart. So what it does is it makes the reed take a little bit more air so it’s not too easy anymore. You can bring it into the right strength if it’s too sharp, it will fix that sharpness. It won’t be quite as sharp. It’ll be a little bit flatter and closer to in tune and it’ll have a more robust sound. So one of my most successful and popular products is the Piper’s Ultimate Reed Poker. So that’s what I would recommend that you get. It’s very easy to use. It’s intuitive. You just stick it in the bottom of the reed until it touches. And because the poker is round, you don’t have to twist it. Twisting doesn’t do anything. Because it’s tapered, the more you insert it, the more it will open up the reed. So it’s very very easy to control. I’ll just put my thumb on the poker. There’s a pen here, but I’ll put my thumb on the poker. Once I insert the poker into the reed, now it’s touching. It hasn’t done anything. It’s touching on the inside of the reed. I’ll use my thumb and give it maybe one or two millimeters and then poke it that amount. So it prevents me from over-poking the reed. And I’ll pull it out and then retest it. So if you don’t have a reed poker, you’ve got to get one of these. Every piper eventually will need this poker because your reed, even if it’s a perfect reed in your perfect chanter and you love it, it’s sounding great and it’s lasting. And if you’ve got it in the Tone Protector and everything’s all hunky dory, eventually that reed will get too easy for you. And the poker allows you to get some additional value and lifespan out of your reed.
I’ve had many experiences over the years where I had a reed that was absolutely perfect and then it just got a little bit too easy. And then give it that little bit of a poke. And then that not only brings back the reed, but some of the very best reeds I’ve ever had have gone through that exact process. They were maybe slightly too hard or just right at the beginning, then they broke in and then they were perfect. And then they got slightly too easy and then I poked them and then they were absolutely perfect, and you get a nice long lifespan out of that reed. So I’ll put the link below to the Piper’s Ultimate Reed Poker. It’s a great value. It will save you so much money over the years, and hassle because you’ll be able to extend the life of your reeds.
Another thing that I recommend you check out is my BagpipeLessons.com Precision Tuning Toolkit. So I launched this a few months ago and the toolkit has the Piper’s Ultimate Reed Poker. It also has my favorite black tape for tuning the chanter notes. It’s got a really cool sanding pad for when you need to do a little bit of sanding of your reed to open up the top to free the reed. It’s got little rubber band elastic bridles that you can put on your pipe chanter reeds when they’re too hard. So these bridles are also used by the dentist or the orthodontist uses them. There are many many different strengths, there are many many different thicknesses, and there are different diameters, and I have done a lot of testing over the years. I found the perfect size and strength of these elastic bridles that you can use for your pipe chanter reeds. So check that out, that is my Tuning Toolkit, it’s got the poker, it’s got the tuning tape for the chanter, it’s got the sanding pad and it’s got the elastics and you get that in a nifty little BagpipeLessons.com little pouch. And that you can get at BagpipeLessons.com/Toolkit. And you’re going to want that, it’s a great value. If you need the poker, you should upgrade to get the toolkit. You get all that other stuff at a great bundle price.
That’s the first thing that you need to look at if your reed is chirping. Couple of other things to look out for. People always say it goes without saying and then they say it anyway. I think it doesn’t go without saying, it’s important to know that your reed is at the right humidity level and that it’s not too dry. Way back before we had Tone Protectors, we had this issue that our reeds would dry out in between playing sessions. Then what I did and what a lot of pipers did for years, is that you would lick your read to get the moisture back into the reed. Because without licking it, the cane could be totally bone dry depending on where you live and the humidity where you live. Maybe it’s not a dry place, but it’s winter and you’re inside and the heat’s going, so everything gets dried out. All that changing humidity and central heating and travel and weather and climate, they all affect our chanter reeds because the moisture in the air where you store your reed affects the moisture content in your reed. We can solve a lot of that with our Tone Protector, but we used to lick our reeds, we used to lick these bone dried reeds. If you have a reed that’s sharp and chirping, it’s been totally fine for a long time and it starts doing that, I would look at your Tone Protector. It should read somewhere around 84%. If the battery’s dead and you have a blank display, well then you need to get a new battery in there so that you know that it’s working, and I have those batteries on my shop. If it’s consistently below 80%, it’s time to change the packets in there. Those Tone Protector humidity packets will last a long time, like many, many months, like six months or more, but they do dry out. Some places in the world where you have your pipes have humidity less than 84%. There are places where it’s much more humid. But the typical places where pipers live, and the homes where we live, it’s less humid than 84%. Which means the Tone Protector, primarily its job is to release moisture into your reed. That means those packets will get dried out. You can see when you have a brand new Tone Protector packet, it’s kind of soft, and you can feel there’s a little bit of moisture in there. It’s kind of puffy and when your Tone Protector packets are dried out, you pull them out and they’re hard and crunchy. They’re in that shape of the inside of the Tone Protector because it’s sort of hardened into that position. So it’s just time to get some new packets. Again, I have those in my shop.
I’m constantly hearing from bagpipers who use a Tone Protector and they love the Tone Protector. It’s just amazing for me as an inventor to have this product be used by so many pipers. Not only is it helping beginners, but I’m hearing from absolutely top world class players who use my Tone Protector as part of their deal, as part of their strategy. There’s so much that goes into competing and performing at a world-class level, but having equipment that works for you and having your reeds be stored and ready to go when you’re ready to play is just a huge deal. I mean I know because I was competing at that level for many years and when your reed is going well and your pipes feel good and they sound good and they stay in tune, everything feels right in the world. And when your pipes aren’t in tune and they’re not stable and the sound isn’t right and they’re not comfortable to play, you’re not happy. Let’s just put it that way.
So make sure your moisture in your reed is solid. Another thing to look at if your reed is chirping is the amount of tape that you have on your chanter. The two places to look for, well you want to look at any place you have more than a third or close to a half of a hole covered. That can be a problem. Typically the first place pipers look is on that high G note. If it’s your high G gracenote that’s chirping, if you have a third or a half of the hole covered, that can be a problem because it interferes with the airflow. Those holes on your pipe chanter, you look at the size of the holes. Those are not just random. Those holes are slightly different sizes depending on the note. That’s because it’s for two things: it’s to get the tuning right in terms of the position. The higher the hole is, the higher the pitch of that note will be. The reason that works is that the pitch of a note is determined by the distance from the top of the reed to the top of that hole. So if you’re playing high A, that’s the highest topmost hole, that’s the shortest distance from the reed to that hole. So that’s the highest note you can have. When you cover that thumb hole, for now you’re on high G, now the next hole in the front is a little bit further down. So now the air has to travel further to get to that and so on. Right?
There’s a similar sort of effect that you have on a guitar when you pluck an open string that’s the lowest that that string can be. And as soon as you start putting your fingers on the frets, you’re making that string shorter and it increases the pitch of that string. So where was I going with that? Oh, so the hole position, the hole’s in that spot so that the note is in tune for that note. The hole size is also important because if you make a hole too small, there’s just not enough opening for the air to escape. There’s a certain amount of air that you’re blowing through that reed to get that chanter reed to sound, to get that beautiful bright resonant sound that we like out of a bagpipe chanter and a bagpipe chanter reed. And the smaller the holes get, there’s a point where there’s not enough air that escapes and you will have problems. You can experiment with this, you know, just get some of your tuning tape and cover up some of those holes and cover up three quarters, cover them up even more so you just have a tiny little sliver of hole coming out and you will discover all sorts of crazy things that happen with your sound. Not only does the tuning get completely out of whack, but you’ll find that you get instability and you get chirping and you get all kinds of undesirable tones and sounds coming out of your chanter.
I remember years ago I had an old, old R.G. Hardie chanter that had cracked, so it was basically not playable. But because I’m kind of an inventor and an experimenter, I took that chanter and I taped up all the holes to seal them up and I flipped it over on the back and I drilled a new set of holes in the same position as the holes that the chanter came with and I thought, “Well, let’s just try this.” Same position holes, but way smaller. They were about the size of practice chanter holes and then what do you think happened? Well, it’s completely unplayable. It was just basically a combination of no sound and extremely muffled sound and squealing, chirping, awful sounds and that’s what I discovered. Oh yeah, there’s a reason that the holes on the pipe chanter are the size that they are. They tend to get larger the further you go down the chanter, and that’s because the bore gets larger. So a practice chanter has a straight bore, you know, if you look in the top on your bottom. It’s a straight bore that can be drilled with a single drill bit. The pipe chanter, if you look at the bottom, it’s much, much bigger. So it’s a conical bore, meaning it’s a cone. It just has to do with the physics of that conical pipe chanter to get that bright projecting sound that we like. You can go and you can read all about the difference between conical bores and straight bores. It’s a fascinating part of instrument design and the physics of musical instruments. But you also notice that as the bore gets larger, as you go down that cone towards the bottom of the chanter, the holes on the front also get larger. So there’s some sort of important relationship there. So check out that you don’t have too much tape on your chanter. The places to look are on the high G note. And also look down below, like look on your low A in particular.
I discovered that a few years ago before I had the Infinity chanter, which I love because of its smaller holes with the closer spacing. I was playing chanters with much, much bigger holes and in order to help with that issue, I was putting tape on the bottoms of the holes. First started doing that when I was in the Simon Fraser University Pipe Band. We had these beautiful, great-sounding wooden Sinclair chanters, one of the great chanters from the previous era. But over the years they had been carved out on the tops of the holes to raise the hole to get a brighter, higher pitch. Well then the holes started getting, I mean they were actually quite oval-shaped. I remember talking to a friend of mine in the band and we both talked about the challenge and the impossibility of playing a good clean birl on these huge holes. So what we started doing is putting tape on the bottom of the hole. Now in that case, these oval-shaped holes, they were round, we drilled them out, now they were oval and you put tape on the bottom, it’s sort of the same size. But if you have a chanter that just has big holes and that’s the design, you can get away with putting a little bit of tape on the top for tuning or a little bit of tape on the bottom to make that hole smaller. But there’s a limit to what you can do and the limit is that eventually you start restricting the airflow and then you get squeals and chirps. So a lot of things there. If your reed is chirping, check the strength of the reed. The reed may be too easy, which means it might need a poke with my Piper’s Ultimate Reed Poker. Or the reed might just need to be replaced, but you don’t know if it needs to be replaced until you’ve poked it first. You may be able to get more life out of that reed. You want to check that the reed is not too dry, so make sure you’re keeping it in your Tone Protector and that the packets are keeping it at 84% or above 80%. Replace your battery if you need to.
The other thing is to watch that you don’t have too much tape on any of your holes. The final thing is hole coverage. It is possible, even if your reed is good and your chanter’s good and your tape is good, that you’re having some issues with hole coverage. So that’s just one of those things you have to play around with. One of the things that I’ve learned is that if the chanter is turned very slightly off from where you’re used to, you can get all kinds of chirping. So that’s an important thing to do. Actually, I’ve marked on the back of my chanter and my chanter stock, I have a line there that I’ve drawn with some Sharpie. I have one of those Sharpie paint pens and it draws nicely on the ferrule and on the back of the chanter. And I just line them up so that I can turn it so those two lines are lined up. And that works fine. The reason I started doing that was I had an experience where I was traveling around Scotland doing my competitions. And I remember exactly where I was one day. I was in between competitions and we’re going to be staying in a B&B. And I wasn’t sure that I was going to be able to play my pipes at the B&B where I was staying that night. So it’s a beautiful August afternoon in Scotland in the highlands, I pulled off on the side of a little country road, a nice little spot there by a river with some ferns. And I just got my pipes out and was playing. And it wasn’t going well. I had just been competing the day before. I was going to be competing that next day. And I was chirping and squealing. And I was starting to freak out, like, “What’s going on with my pipes here?” These were just fine. This is before Tone Protectors. But I was like, “What’s happening? I’m playing every day. My pipes aren’t, I haven’t done anything to my pipes.” And I made a little bit of an adjustment to the turning of the chanter and the stock. And then it was back. It was totally back to normal. And I was completely relieved. And it was at that point that I realized, finally, it just hit home so dramatically that a very, very slight turn in that chanter can just have a huge impact on the whole coverage. So ever since then, I just do a little drawing on there. So all it looks like is the chanter stock. So that’s going into the bag here. And then my pipe chanter, it’s something like this. And I literally have a line drawn on the back that no one can see but me. So you can experiment. So what I recommend you do is get your pipes, get them turned exactly how you want, play for a while, make little adjustments. If you’re happy, great. Make a little mark. And then the next day when you go to play, and you take your Tone Protector off, and you go to put your pipes in, don’t look at the mark. Not yet. But just adjust it to get it exactly where it feels right. maybe make a couple adjustments, play a little bit, do some fine tuning, and then go and look. If it’s slightly off, I would just make another mark, and you have two little marks. You want to repeat that process until, without looking you consistently find the right spot, and that means that’s your spot. Then, you know that, “Okay, that’s my spot.” Then if you line the lines up, and then you strike in, and then it doesn’t feel right, well, maybe it’s not your chanter. Maybe you’ve got to push your bag up or get something organized, you know, something else straightened out. So, that’s what I’d recommend. A little bit of White Out, nail polish, a Sharpie.
I’ve also seen people who take a piece of tape, just take a single piece of tape, like black electrical tape, and then just slice it in two and then line up the pieces of tape. That works fine too, but either way, what you want to do is eliminate that variable that there’s going to be something different when you when you assemble your pipes. You want to be the same every time. So that’s all about chirping.
I guess we have time for one more question. Thanks everybody for watching who’s liking and watching today. If you’re watching on the replay, thanks. So the question was about let’s see here, “Fingering has been my greatest challenge and my greatest challenge is my dexterity.” So really what we’re talking about is, “What can you do to keep your fingers loose and relaxed so that you can execute these fine motor skills and play your technique clean with consistency and clarity and without the crossing noises and not miss anything and not put anything extra in there?”
So the most important thing on sort of a macro level is to maintain good form. Which is to keep your hands relaxed and to keep them in as close as you can to the chanter. So another way to think about that is what I call ‘soft hands.’ So you’re not hard, you’re not rigid, you’re not stiff, you’re not tight, but you have soft hands. Then you keep them as close as you can into the chanter. Those are the two main things, the pillars of good bagpipe technique. Beyond that I would say if you do have some stiffness and tightness in your forearms and hands, doing some gentle stretches. So you can just look up on YouTube and look, you know for hand/finger stretches. One that I like is just like you’re holding a tray, and just pull back like this. I can really feel it in here. You can also do this prayer thing and then push out. Another one is to roll your wrists, and I can feel that. I can feel it stretching in here. Also do some self massage where you just rub your forearms. I really like that if I’m going to be playing. I’ll probably do some combination of just a couple minutes of this self massage, get the blood flowing. It’s helping by rubbing the forearms, but it’s also helping the hand which is doing the massaging as well.
Finally I would say to do some general finger exercises is a good idea. There is a great series of videos on Youtube by Greg Erwin and I’ll put the link below. Or you can look up ‘Greg Erwin finger yoga,’ and it’s really cool. He does a series of exercises. The first one starts out like this. So you’re getting a little bit of a squeeze, then the full extension, and switching back and forth. He also has exercises where you do individual fingers. So it’s a bit of strength work, but it’s a lot of nimbleness and flexibility work. The other thing that you get from these exercises is finger independence. So you’re doing that sort of thing, and then you’re doing the pinky, and then he does groups of two, that sort of thing. So I go through phases where I do more of these finger yoga exercises. And it’s a fun thing to do. When you’re sitting, if you’re driving for example, and you’re at a stoplight, just do this. “How many times can I do this?” Do 20 of these, or the index finger, so something like that.
Well cool, you’ve wasted another half an hour with me on the channel so thank you very much. I’ll just say if you like this video, if you love it even better, but if you enjoyed this video and you want to watch more of these, check out the BagpipeLessons.com Youtube channel and subscribe. It really does matter that you subscribe because it lets Youtube know that you like the content. Then Youtube is more likely to share my BagpipeLessons videos with others. So if you love it, please subscribe and hit that little bell and you’ll get notified when I do these lives. I’m going to try to do these more.
If you want to take your pipe skills to the next level, check out my BagpipeLessons.com Inner Circle. I do weekly Zoom classes for my members. There’s a lesson library with hundreds of lessons on all topics related to bagpipes and tunes, exercises, product demonstrations, blowing steady, expression, all that stuff. And every one of my live classes has been recorded and you can watch the replay. Membership also includes all of my online courses, like my Bagpipe Essentials Masterclass, which is an online course with 31 videos on all the essentials of bagpipe technique. So check out my membership at BagpipeLessons.com/membership and sign up for the YouTube channel. If you’re looking for Tone Protectors and the Toolkit and all that good stuff, I’ve got them on my shop BagpipeLessons.com/shop. Let’s wrap it up there. Thanks for joining me in my kitchen today and we’ll see you next time.
Mahalo.

Get the most out of your practice time.
How is practice different from simply playing your pipes? Find the answer and learn some valuable tips.
FREE guide
More Videos